Non-Contact Voltage Detector: Electricity can cause injury or even become the cause of death; that is why safety must come first when working with electrical devices or electricity. In this article, we will show you how to design a simple, efficient non-contact voltage detector by using transistors. You can build this circuit by using simple components and test the presence of AC voltages. You need not worry about getting zapped because it is a non-contact voltage tester.
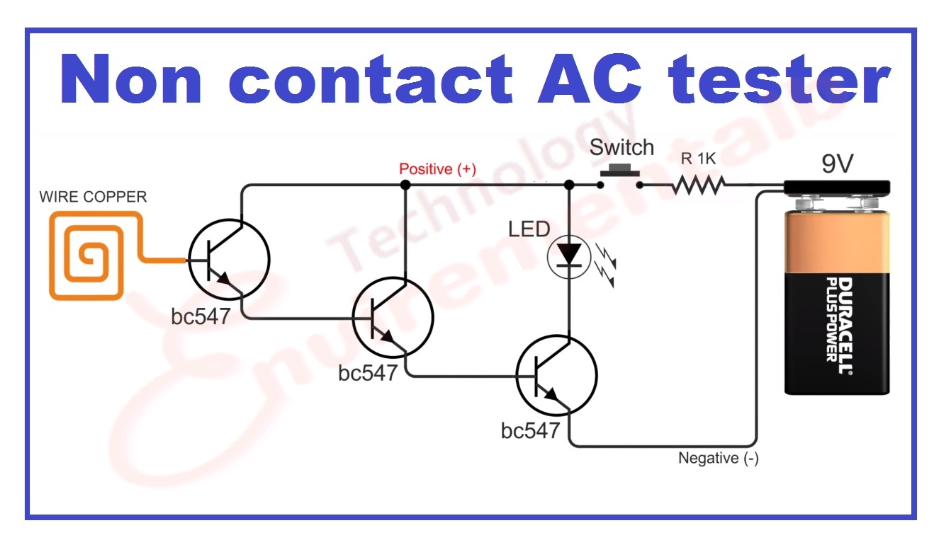
Table of Contents
Introduction Non-Contact Voltage tester
In this modern age almost everything we use has an electric current. Before working with an AC object, we must verify that the current is not present where we work. So we use the tester. A non-contact voltage tester is a safe way to make sure that the AC power is off.
In this project, we have designed a very simple non-contact voltage circuit by using transistors. We have used only one type of transistor in this project.
Circuit diagram of the Non-Contact Voltage tester
Components Required For Non-Contact Current Tester
| Qty. | Part Description | Mfr. Part No. |
| 3 | Transistors | BC547 (NPN) |
| 1 | LED, Red | or any color |
| 1 | Buzzer (optional) | 3v |
| 1 | Switch | any type |
| 1 | 9V Battery or 3v can be used also. | or supply |
| 1 | Battery Snap | |
| 1 | Case any plastic cover | plastic cover |
Required Tools:
Soldering Iron
Soldier
Drill and drill bits (for making holes in the box)
Copper Wire
Cutters (for copper wire)
Adhesive Tape
Circuit Design of Non-Contact Voltage Tester
Make an antenna with a small piece of copper wire that is connected to the base of the first transistor (BC547). The antenna detects the magnetic field when we place it near AC objects like cables and switches, etc.; it gets a small amount of current and activates the first transistor through the base.
The output of the first transistor drives the second transistor; it gets activated, and the third transistor is activated with the second transistor’s output. As the third transistor activates, the LED is turned ON.
We can use a small buzzer inplace of an LED. The buzzer will alert you through voice. The buzzer should be 3 volts because we are using a 3V battery.
How to Operate a Non-Contact Voltage Tester?
- Make the connections as per the circuit diagram.
- Connect the battery to the circuit.
- You can place the circuit in a small box.
- Place the antenna near the electrical appliances.
- LED will run if the voltages are passing through the objects.
Applications of non-contact voltage detectors
- This simple Tester can be used in many places and near many objects like switches, cables, outlets, cords, junction boxes, circuit breakers, fans, motors, etc.
- You can make it portable by fixing it into a small box.
Two Transistors Voltage Tester
Thank you so much for visiting our website. If you have any questions about this circuit or any circuit about electricity or electrons, you can discuss freely.